
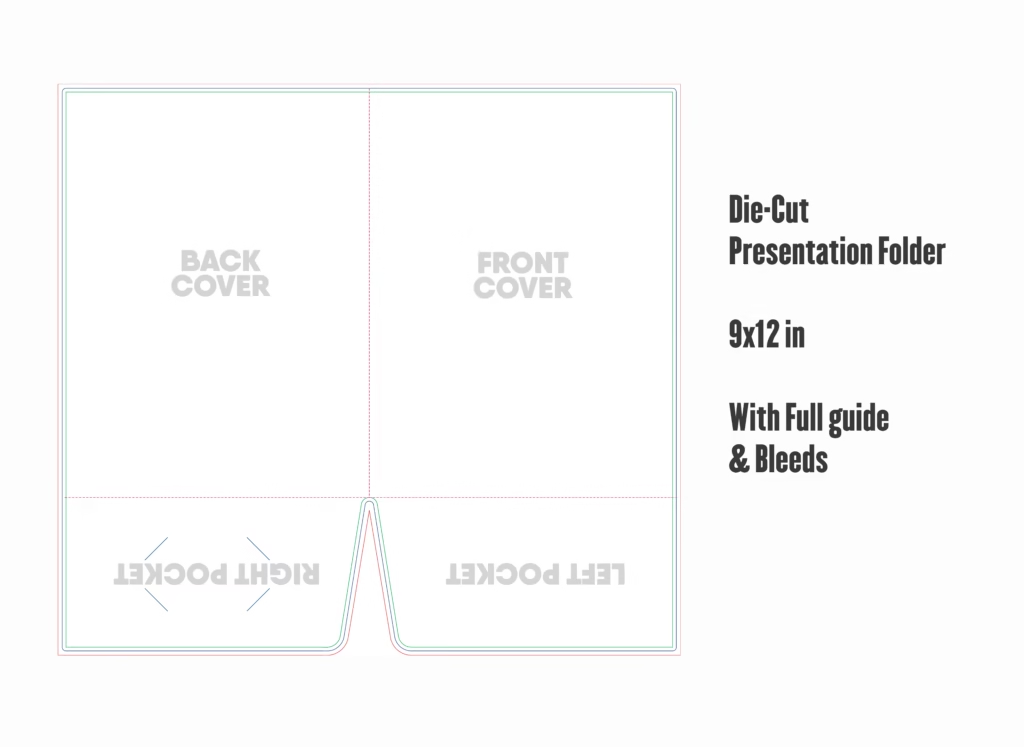
Looking for a production-ready 9×12 presentation folder template engineered specifically for commercial offset and digital presses? This free vector dieline package from DesignoFly Studio delivers the exact industry standard specifications required by trade print houses across North America and Europe. Sized perfectly to enclose standard 8.5″ × 11″ US Letter sheets, proposals, contracts, sales collateral, and multi-page corporate media kits without buckling or dog-eared corners.
📐 9×12 Presentation Folder Blueprint & Print Dimensions
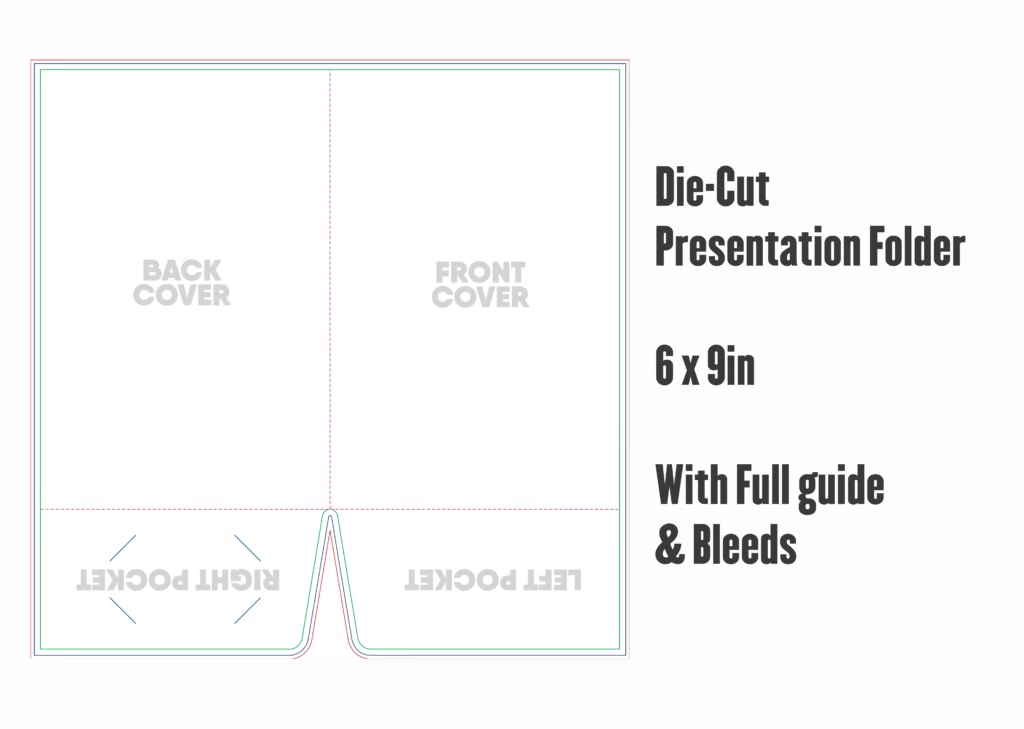
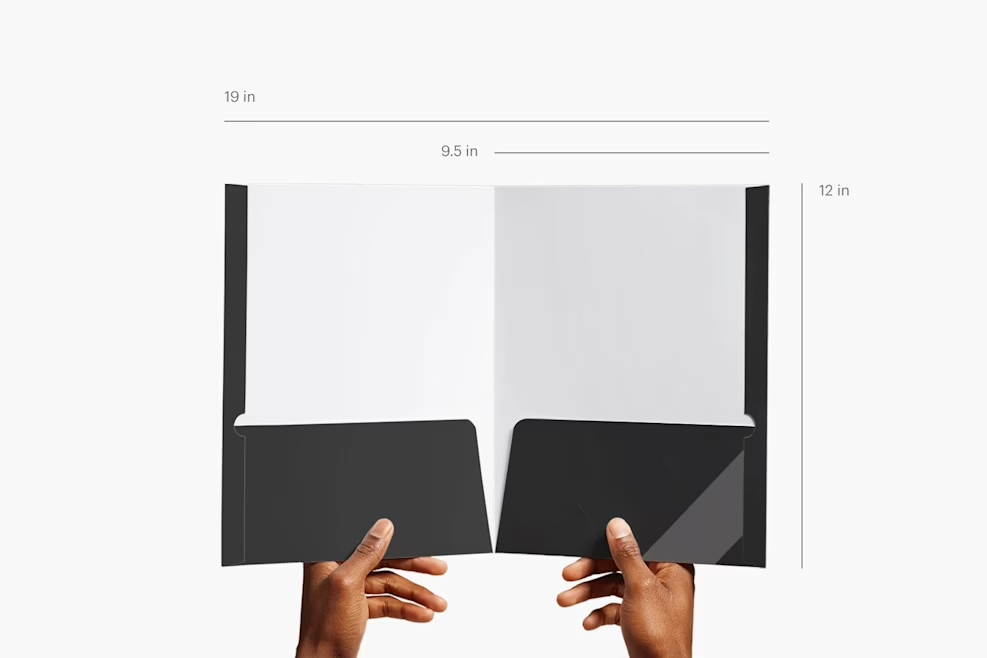
Achieving clean folding, balanced glue joints, and flush trim edges begins with exact millimeter calibration. This vector template is built to standard trade folder dimensions, featuring twin 4.00-inch internal pockets and horizontal business card die-cut slits on the right-hand flap:
Outer Boundary
Extend all background graphics, photographic imagery, and color fills out to this perimeter to prevent white unprinted margins during die-cutting.
Die-Cut Blade
The physical cutting blade line. When folded, the closed presentation folder yields exactly 9.00″ × 12.00″ with dual 4.00″ high pockets.
Critical Content
Keep all critical brand assets, typography, partner logos, and contact information at least 0.25″ inward from all trim, score, and pocket fold lines.
📂 Template Architecture & Vector Layer Hierarchy
Commercial folder manufacturing requires strict separation between visible print artwork and non-printing machine guides. When you open this .ai file in Adobe Illustrator, you will find a cleanly structured layer hierarchy designed to prevent accidental dieline flattening:
- [DO NOT PRINT] DIE-LINE & CUT MARKS: Contains the solid magenta (100% Magenta Spot Color) cutting line strokes and dotted cyan scoring/crease line paths. This layer is set to non-printing and overprint stroke mode so it guides the automated cutting table without contaminating plate separation.
- GUIDES & MARGINS: Contains non-printing Illustrator vector guides demarcating safe zones, pocket fold heights, and standard 3.5″ × 2.0″ business card slit positions.
- ARTWORK (OUTSIDE COVERS): The designated workspace for your Front Cover, Back Cover, and Outside Spine design.
- ARTWORK (INSIDE PANELS & POCKETS): The layout canvas for internal background colors, pocket face graphics, and company contact details.
🛠️ Step-by-Step Tutorial: Customizing Your 9×12 Folder in Adobe Illustrator
Follow this professional pre-press walkthrough to build an executive-level presentation folder without technical setbacks:
Step 1: Open the Vector Package and Inspect Document Color Mode
Launch Adobe Illustrator and open 9x12-Presentation-Folder-Template.ai. Navigate to File > Document Color Mode and verify that CMYK Color is active. Commercial packaging presses operate exclusively in 4-color process (Cyan, Magenta, Yellow, Key/Black). Designing in RGB will cause drastic color shifts when vibrant screen colors convert into physical process inks.
Step 2: Designing the Front and Back Exterior Panels
Select the ARTWORK (OUTSIDE COVERS) layer in your Layers panel. Remember that an unfolded presentation folder lays flat as one continuous sheet:
- The Right Half (Panel 1) represents the Front Cover. Place your primary company logo, hero imagery, and corporate tagline here, centered within the 8.75″ × 11.75″ safety boundary.
- The Left Half (Panel 2) represents the Back Cover. Position your secondary branding, office locations, website URL, and social media handles in this zone.
- The Center Fold Line marks the spine. Ensure background color fills pass completely across this line to avoid a visible hairline crack when the folder is assembled.
Step 3: Styling the 4-Inch Interior Pockets & Glue Tabs
The bottom flaps fold upward during finishing to create the pockets. When designing the pockets:
- Artwork Orientation: Pocket artwork must be placed right-side-up as you view the flat dieline. Once folded upward along the score line, your pocket text and graphics will display properly.
- Glue Flap Clearance: Notice the small tapered side tabs on each pocket. Keep background artwork away from the glue contact zones. Excessive varnish, heavy ink coverage, or UV coatings on glue tabs prevent hot-melt packaging adhesives from bonding securely.
- Business Card Slits: The right pocket includes pre-calibrated horizontal die-cut slits designed for standard 3.5″ × 2.0″ business cards. Avoid placing critical typography directly behind or between these slits.
Step 4: Managing Color Profiles & Rich Black Standards
For solid dark backgrounds and deep corporate navy or black panels, never use 100% K (Default Black), which results in a dull charcoal appearance on heavy paperboard. Instead, use a calibrated Rich Black mix:
- Recommended Corporate Rich Black: 60% Cyan, 40% Magenta, 40% Yellow, 100% Black. Total Area Coverage (TAC) = 240%, ensuring deep obsidian saturation without ink-drying delays.
- Small Body Typography: For text sized below 14pt, strictly use 0% C, 0% M, 0% Y, 100% K. Multi-color black text on fine lines will cause blurry haloing if plates experience microscopic press shifts.
Step 5: Converting Typography to Vector Outlines
Before transmitting production artwork to your commercial printer, unlock all artwork layers, select all objects (Ctrl + A / Cmd + A), and navigate to Type > Create Outlines (Ctrl + Shift + O / Cmd + Shift + O). This converts all live editable type into resolution-independent vector paths, eliminating font substitution errors on external prepress RIP servers.
🖨️ Commercial Pre-Press & Export Checklist
Ensure your final production PDF passes digital flight-checking without pre-press rejections by validating these mandatory requirements:
- ✓ Resolution of Linked Images: All placed photographs, textures, and raster mockups must be 300 DPI or higher at 100% output scale.
- ✓ Bleed Margin Activation: When exporting via File > Save As > Adobe PDF, select PDF/X-1a:2001 or PDF/X-4. In the Marks and Bleeds tab, enable 0.125″ document bleed settings.
- ✓ Overprint Stroke Verification: Verify in the Attributes panel that the magenta die-line path is set to Overprint Stroke so that the underlying artwork is not knocked out into white space.
📦 Paper Stock, Weight & Premium Finishing Recommendations
A high-caliber presentation folder demands substantial paperboard that feels sturdy in a prospective client’s hands:
- 14pt / 16pt Heavy Cover Cardstock: The commercial gold standard for corporate presentation packaging. Provides crisp, rigid score lines and prevents sagging when filled with 20+ pages of contracts.
- Soft-Touch Velvet Lamination: Imparts a luxurious suede tactile feel that is completely fingerprint-resistant and protects the spine from cracking during repeated opening and closing.
- Spot UV & Metallic Foil Stamping: Apply gloss Spot UV varnish over your logo or key graphics against a matte background to create high-contrast visual depth.
❓ Frequently Asked Questions (FAQ)
Can I modify the business card slit orientation to vertical?
Yes. Simply unlock the [DO NOT PRINT] DIE-LINE layer, select the horizontal slit vector paths on the right pocket, and rotate them 90 degrees or replace them with vertical slit guides measuring 2.0 inches wide with 3.5 inches height clearance.
Does this template accommodate heavy multi-page presentation booklets?
This standard dieline features a traditional flat single-crease spine, comfortably holding up to 30 sheets of 20lb copy paper or 15 sheets of 80lb text stock. For catalogs exceeding 50 pages, consider our 9.5×12 folder template with an expanded 0.25-inch box spine.
Is this template compatible with CorelDraw and Affinity Designer?
Yes. The included vector EPS file opens seamlessly with full vector path preservation in CorelDraw, Affinity Designer, and Adobe InDesign. All cut and score lines remain fully selectable and editable.
Are there any licensing restrictions for client commercial projects?
No. DesignoFly Studio provides this presentation folder dieline under a 100% free commercial license. You are fully permitted to design, produce, and sell physical printed folders for corporate clients and commercial brands worldwide without royalty fees or attribution requirements.